Manage information layers on a map
On a map, you can display and hide standard map information such as icons, streets labels, landmarks, building footprints, and more. Each of these map items is stored on a layer for the map. FH Mobile Response provides an extensive set of layers, that cover all of North America. You can also add your own local data as layers to the default map set.
You can display and hide FH Mobile Response graphical elements, such as location push-pins, routes and routing icons, plumes, and more.
-
Do one of the following.
- Choose Go → Tools → Map Commands → Layer Manager.
- (Premium) On the Main toolbar, click Layer Manager.
The Layer Manager pane appears to the right of the maps.
Tip: To view all the columns in the pane without needing to scroll from side to side, place the mouse pointer on the left edge of the pane and, when the mouse pointer turns into a double-headed arrow, drag the edge of the pane to the left until all the columns appear.
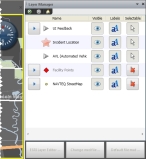
In the Layer Manager, the major sections are UI Feedback, Incidents, AVL, Facility Points, NAVTEQ, and other map layers.
 UI Feedback
The UI Feedback layers are the layers FH Mobile Response calculates and displays on the map for the user.
Push Pins
The push pin layer displays the result of any find-location , geoquery, or point-of-interest (POI) search that appears on the map.
Example: If you use the find locations feature and type in
Main St., Los Angeles, CA, push pins appear on the map for the results. Turning off this layer hides the push pin on the map, but still provides the list of found points on the bottom of the screen. Push pins are rarely labeled, however the selectable property is usually active by default.Information on using the find location feature is available in Find a location on a map.
Search Area
Any point-of-interest (POI) search or geoquery search is searching a specific area of the map. The search area is that region. Because the POI search searches the entire visible region of the active map, the entire map tints green. However, other searches, such as a 1 mile wide search, have an area that fits into the map (assuming you are zoomed out high enough).
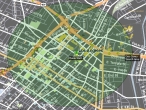
Disabling Search Area removes the green tint that identifies the search area. Disabling the labels removes the
Geo Query Search Areatext identifying the search area. There is usually no reason to make the search area selectable.Information on search areas is available in Find a point of interest (POI)
Miscellaneous
The Miscellaneous layer consists of internal layers, such as the GPS simulator's route selection. Most miscellaneous layers do not affect user operations.
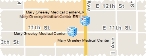
Weather Query
The Weather Query layer displays weather-related data on the map.
Example: If you open the location information tool and select a location the map. weather information appears for that point, including a sun/clouds icon at the weather acquisition site, on a red line path from the selected point.
These graphical elements do not appear if you disable the Weather Query layer. Labels are used by this layer to display the station ID. There is usually no reason to make the layer selectable.
Information on the viewing weather-related data for an incident is available in View a summary of the incident's weather.
Detectors and sensors
FH Mobile Response can read detector and sensor inputs from a variety of commercial data sources, and display corresponding icons on the map. .
Information on detectors and sensors is available in Work with detectors and sensors.
Routing
- The Waypoints layer displays the start flag (if there is one) and the destination flag of the calculated route. This layer uses both labels and selectability.
- The Route Line layer displays the calculated route between the start point (or the unit's GPS location when the calculation was made) and the turn-by-turn colored 'turn point' circles. This layer does not normally use the label property, and the layer is not selectable.
- The Direct Line layer provides a calculated straight line between the current GPS-tracked location and the destination point. This layer provides a sense of direction while approaching the destination location.
Information on routing is available in Work with routing.
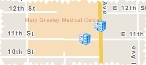
Location Information
Th Location Information layer provides the blue circled i icon associated with the location information feature. It has no functional label and is not selectable.
Information on location information is available in View location information.
Pictometry Location
Pictometry is a third-party application embedded into FH Mobile Response. It is similar to Bing Bird's Eye imagery, in that the photographs it displays are taken at a 45-degree angle, oriented in four directions. Pictometry adds measurement tools to help you analyze a location.
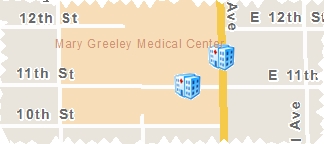
The Pictometry Location layer displays push pins on the street map representing the center (represented as a red cross hatch on the Pictometry window) of the Pictometry view. A blue push pin represents the active Pictometry map pane, and a white push pin represents non-active Pictometry panes. This layer has no label or selectability function.
Information on Pictometry is available in Change map and data file locations and at at http://www.eagleview.com/Products/ImageSolutionsAnalytics/PictometryImagery.aspx.
Incidents
The Incidents section of the Layer Manager pane provides all of the incident specific layers.
Incident Location
Each open incident appears on all open maps using the Incident Location layer's iconography. If the incident type is known (it was selected using Types or the CAD's incident type has been matched to FH Mobile Response's), then the icon representing the incident type appears on the map. If the incident type is not known or has no match, then a red star appears. Incident labels display the incident ID, and many features use the selectability of this layer.
Plumes
The Plumes layer controls all Areal Location of Hazardous Atmospheres (ALOHA) and National Institute for Occupational Safety and Health (NIOSH) dispersion modeling. Labels in this layer denote multiple toxicity or response regions and what they mean.
Annotation
The Annotation layer controls the display of a note of explanation or comment added to an incident or element. All Annotation layers can be hidden using the one control. Labeling and selectability both have significant meaning for annotations.
Isolation Rings
The Isolation Rings layer controls the display of isolation or action zones on the map. Many automated guidance set parameters or models use the isolation rings.
For example, explosive ordinance incident types display as follows.

Disabling visibility for this layer removes all isolation zone displays. The labels are very important for determining the function of the rings. The layer is not selectable.
Roles
Some organizational roles can be dragged from the incident's organizational chart onto the map. This is especially useful when designating operational command centers. Both labels and selectability are utilizes for this layer.
Resources
The Resources section represents all resources assigned to the incident that have been dragged to the map, representing assigned locations. Both labels and selectability are critical to this layer's functionality.
Note: This layer does not control automatic vehicle locations (AVL).
AVL
The AVL section lets you toggle on and off the automatic vehicle locations on the map, so that you can hide vehicles congregating at the incident site when as they obscure the map. Both labels and selectability are critical to this layer's functionality.
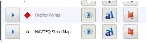
Facility Points
The Facility Points section locations on the map that have preplans associated with them. Both labels and selectability are critical to this layer's functionality.
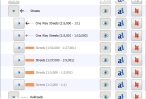
NAVTEQ and other map layers
The NAVTEQ map layers and any additional layers managed by your geographic information system (GIS) department are found on the rest of the hierarchical list. The Layer Manager pane provides the ability to turn on or off any one or groups of these layers.
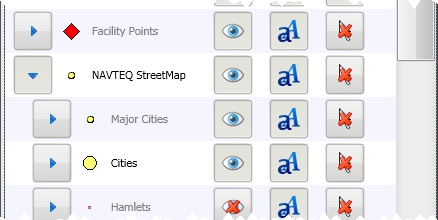
By default, four columns of icons appear in the Layer Manager pane, and the appearance of the icons in each layer's row indicates information about the layer.
Icon Indicates 
The layer is contracted in the Layer Manager pane, and sub-layers are not displayed.
Example:

The layer is expanded in the Layer Manager pane, and sub-layers are displayed.
Example:

The graphical element representing the layer is visible on the map.
Example: For the NAVTEQ POI→ Navteq Hospital layer, hospital icons are visible on the map.

The graphical element representing the layer is not visible on the map.

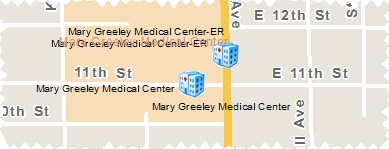
The label for the layer is visible on the map.
Example: For the NAVTEQ POI → Navteq Hospital layer, hospital labels are visible on the map.

The label for the layer is not visible on the map.

The map elements for the layer can be selected on the map.

The map elements for the layer can not be selected on the map. -
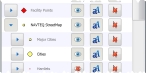
Find the name of a layer you want to work with, and click the right-pointing arrow
 to the left of the name.
 The icon on the buttons changes to a down-pointing arrow
 and the layer expands, listing all the sub-layers in it.
Tip: You can collapse the listing of sub-layers by clicking the down-pointing arrow
to the left of the layer name. - (If necessary) Repeat the previous step for sub-layers, to expand the hierarchy further and view additional sub-layers.
-
For the layer of interest, do any of the following.
- Click the icon in the Visible column to enable or disable the display of the layer's geographical item icon on the selected map.
- Click the icon in the Labels column to enable or disable the display of the layer's geographical item label on the selected map.
- Click the icon in the Selectable column to enable or disable the ability to select the geographical item on the selected map.
Note: Settings on layers higher in the hierarchy supersede settings on the sub-layers.
Example: Suppose that the icon in the Visible column for the NAVTEQ StreetMap layer is set to visible
 , that you have expanded the NAVTEQ StreetMap layer, and that you clicked the icons in the Visible column for the sub-layers, so that you have a mixture of visible and hidden geographical information on the selected map. If you then click the icon in the Visible column for the NAVTEQ StreetMap layer so that it is set to not-visible (hidden)
  , all of the sub-layers under NAVTEQ StreetMap disappear from the map (become hidden), regardless their individual visibility setting.
 -
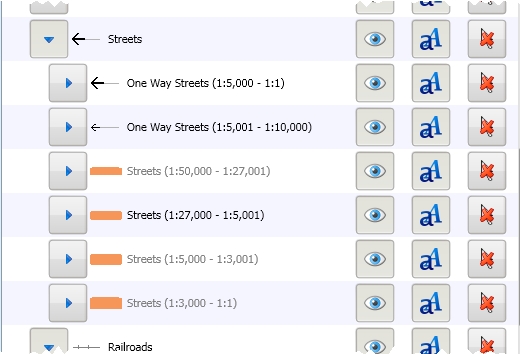
(Optional) Drag the Name column further to the right, and observe the zoom distance behind layer and sub-layer names.
The scale range (zoom level) for each layer appears in parenthesis behind the layer name. Layers or sub-layers that are currently within the scale range are identified with black text, and their graphical elements appear on the map if the icon in the Visible column is set to visible
. Layers or sub-layers that are not currently within the scale range are identified with grey text, and their graphical elements do not appear on the map, even if the icon in the Visible column is set to visible
.