Add staffing exchange or exception
An exchange occurs whenever two or more staff members trade hours or shifts in the schedule. An exception occurs whenever a staff member is absent (for illness, vacation, and so forth) and it is not necessary to replace that person in the shift (no other staff member covers for the absent staff member), or when additional staff members are added to a shift for public events, training events, and so forth.
|
Note: Any time staff members need to exchange shifts, an exchange record must be added to the schedule for each person covering the duties of another staff member. Example: If two staff members are needed to cover the shift of the regularly assigned staff member, two exchanges need to be added to the schedule. |
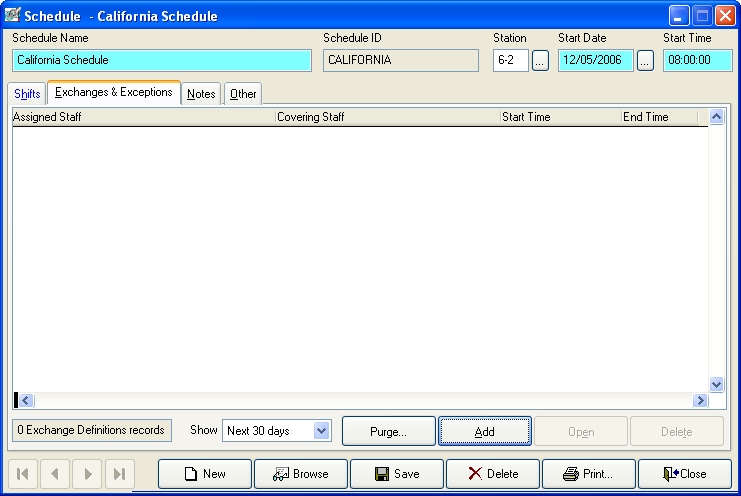
- (If one is not open already) Open an existing schedule.
-
Click the Exchanges & Exceptions tab.
-
Click Add.
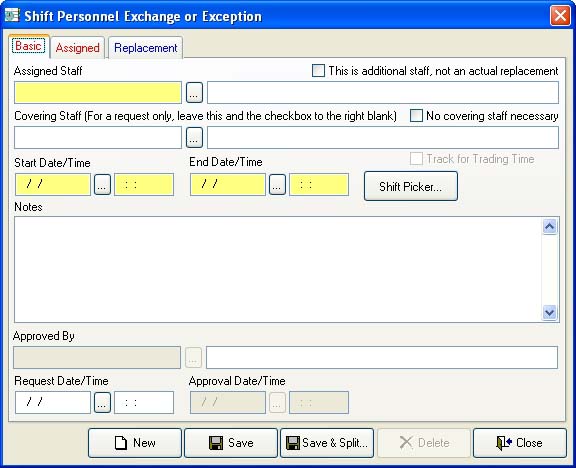
The Shift Personnel Exchange or Exception dialog box appears.

-
(If you are adding a staff member instead of replacing an absent staff member) Select This is additional staff, not an actual replacement.
Assigned Staff, No covering staff necessary and the Assigned tab become disabled, and Covering Staff becomes required.
- (If it is available) In Assigned Staff, type the staff ID number of the staff member assigned to work in the time period, or click the lookup button
 and then use the Query dialog box that appears to select the staff member.
 -
In Start Date/Time and End Date/Time, type the beginning and ending dates and times for the staff member exchange or exception, click the lookup button
for each field and then use the Calendar dialog box that appears to select the date and time, or click Shift Picker and use the Shift Picker dialog box to select the shift that needs to be covered.Note: The staff member you specified in step 5 must be on-duty in the dates and times you specify.
-
(If the staff member does not need to replaced) Select No covering staff necessary.
Covering Staff, This is additional staff, not an actual replacement, and the Replacement tabs become disabled.
-
(If the staff member does need to be replaced) In Covering Staff, type the staff ID number of the staff member who will replace the assigned staff member in the time period, or click the lookup button
and then use the Query dialog box that appears to select the select the staff member.Note: The replacement staff member must not already be on duty in the specified time period.
-
(If you specified a staff member in Covering Staff) Select or clear Track for Trading Time to indicate whether FH should track staff member exchanges.
If selected, you can later run a report in FH to see a list of trades (exchanges) that have occurred between staff members by choosing Reports → Staff, Activity, and Training Reports, and then in the Reports dialog box that appears, select Staff, Activity, and Training Reports → Staff Scheduling Reports → Exchange Time Tracking.
- In Notes, type an explanation for the exchange or exception.
- In Request Date/Time, type the date and time the request for the exchange or exception is being made, or click the lookup button and then use the Calendar dialog box that appears to select the date and time.
-
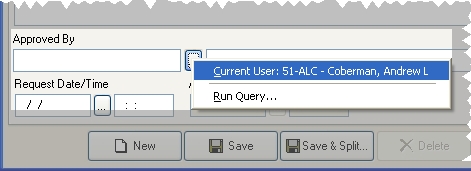
(If it is available) In Approved By, type the staff ID number of the staff member who approves the change of staff members in the time period, or click the lookup button
and then select an option from the menu that appears.
Note: The staff member you selected must have the appropriate security rights to approve the change of staff members.
-
In Approval Date/Time, type the date and time the approval for the exchange or exception is granted, or click the lookup button
and then use the Calendar dialog box that appears to select the date and time. -
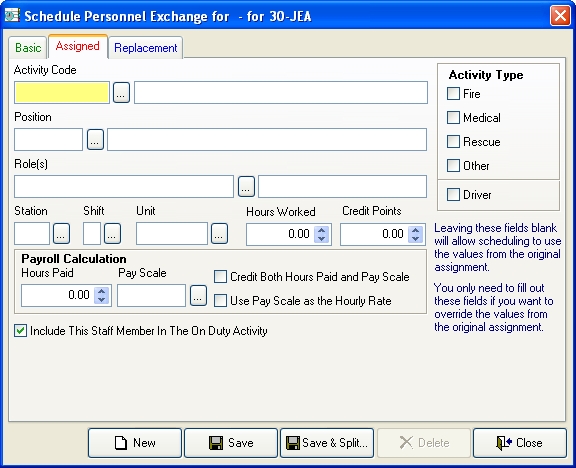
Click the Assigned tab.
Note: Except for the required value in Activity Code, filling in the rest of the fields on this tab is optional. If the fields are left blank, FH uses the values from the original assignment for the staff member who will normally be assigned to the shift. You only need to specify values on this tab if you want to override the values from the original assignment.
Example: In Activity, departments typically enter a code (such as
VCfor vacation, orSCfor sick) to indicate why the staff member is not on duty during a time they are normally assigned. -
In Activity Code, type the code for the activity performed during the shift, or click the lookup button
and then use the Lookup - Staff Activity Types dialog box that appears to select the activity. - In Position, type the code for the position held during the shift, or click the lookup button and then use the Lookup - Staff Activity Positions dialog box that appears to select the position.
- In Roles, type the code for the role filled during the shift, or click the lookup button and then use the Lookup - Scheduling Roles dialog box that appears to select the roles.
- In Station, enter the station's code, or click the lookup button and then use the Lookup - Stations dialog box which appears to select the station's code.
- In Shift, type the code for the shift, or click the lookup button and then use the Lookup - Shifts dialog box that appears to select the shifts.
- In Unit, type the code for the vehicle used during the shift, or click the lookup button and then use the Lookup - Units dialog box that appears to select the vehicle.
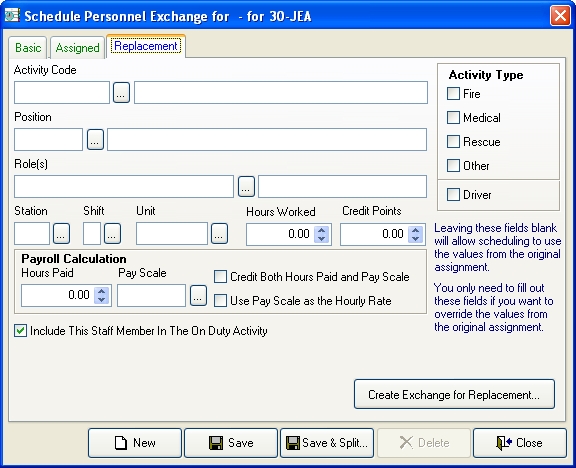
- Under Activity Type, select the activities performed during a shift.
- In Hours Worked, enter the number of hours worked during the shift.
- In Credit Points, enter the number of points the activity earns toward a training program.
- Under Payroll Calculation, in Hours Paid, enter the number of hours paid for during the shift.
-
In Pay Scale, enter the flat rate paid for a specific activity, or click the lookup button
and then use the Lookup - Pay Scales dialog box that appears to select the pay scale. Note: The flat rate set up for the pay scale is the same regardless of the number of hours entered in Hours Worked, unless you specify a combination of hours paid and pay scale, using the pay scale as the hourly rate, or an exception for a specific staff member.
Additional information on pay scales and combination with hours paid is available in the FH online help, in the Pay topic. Information on specifying an exception is available in Add staffing exchange or exception.
-
Select or clear Credit Both Hours Paid and Pay Scale to indicate if a combination of the hours paid and the flat-rate pay scale should be used.
Additional information on pay scales and combination with hours paid is available in the FH online help, in the Pay topic.
- Select or clear Use Pay Scale at the Hourly Rate to indicate if the flat fee for the activity is to be used as the hourly rate charged for performing the activity.
-
Select or clear Include This Staff Member In The On Duty Activity to indicate whether to include the staff member in activities created from staff scheduling.
-
Click the Replacement tab.
Note: Filling in the fields on this tab is optional. If the fields are left blank, FH uses the values from the original assignment for the staff member who is covering for the absent staff member.. You only need to specify values on this tab if you want to override the values from the original assignment.
- Repeat steps 15-27 as needed for this tab.
-
Click Create Exchange for Replacement.
Caution: On the Basic tab, Approved By must be completed before the exchange or exception is complete. The approval can be completed now or later by a user with sufficient security rights.
-
Click Save, and then click Close.
Note: Once you have set up a schedule, you can also create exchanges and exceptions through the Scheduling Console dialog box.
Information on creating exchanges is available in Add a staffing exchange or exception. Information on creating exceptions is available in Add staff members to a shift and Reassign a staff member on a shift.