Add new user
Access to FH is controlled via users and security. Users and security provides control over who can access the software, and what functions they are able to perform.
Add individuals who can access FH. If you are setting up your system
for the first time, we recommend that you add a new user identity with
full rights, and reduce the default user identity rights (user name equals Guest, and password equals Demo.
Warning: Do not lose the administrative account user names and passwords. These should be stored in a secure location.
- Select the Administration menu, Users and Security... option.
-
Press New.
The User Setup form is displayed.
- Enter the User Name for the user.
-
Press Set Password..., type the user password in the Password and Confirm Password fields, then press OK.
Passwords can be required via the Administrative Options form General section.
Certain password complexity requirements may also be specified in the Administrative Options form.
-
Press Link to Staff ID to select a staff member to assign to this login.
Associating one login with one staff member makes auditing specific user activity much easier.
- When the user profile has been used to access FH, do the following.
- Press View Login Info... to display a log of accesses using the profile.
-
 Complete the General
section.
Complete the General
section.
-
Check Administrative Access to give user full access to all areas of the system, including the ability to modify their own rights.
Many options remaining on the form are disabled when Administrative is enabled. Administrative access provides complete access to all areas of the system, so no further security definitions are required.
-
Check Customize Workstation Options & Toolbars to allow the user to modify workstation options, and to add, edit, or modify toolbars.
The Workstation Options form is accessed from the Tools menu.
-
Check Change Password to allow the user to modify their own password.
The Change Password option is included in the Tools menu.
- Check Update SpellCheck Dictionaries to allow the user to add words to the spell check dictionary and modify word-replace options.
- Check Create Memorized Templates to allow the user to add record templates.
- Check Create or Modify Queries to allow the specified user to create or modify queries. Queries are used for browse lists and reports.
- Check Create or Modify Reports and Labels to allow the specified user to create or modify reports and labels.
- Select a form in Auto-Launch Form on Login if the user generally uses a specific form.
-
-
Complete the Modules
section.
- Click the Modules tab.
-
Specify a combination of the following rights for each area.
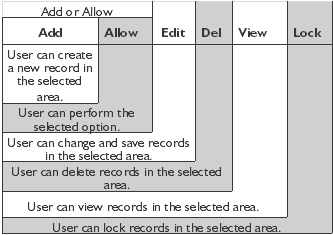
"View” rights are assigned when any other rights are assigned. Removing “View” rights removes all other rights in the selected area.
Note: When rights are assigned for Unit & Personnel (from outside the incident report), the assigned rights apply to responding unit and personnel records added via the File menu Unit & Personnel Response Entry option. A user with rights to NFIRS Incident Reports will still be able to add responding unit and personnel records inside NFIRS incident reports.
-
Complete the Lookup
Tables section.
- Click the Lookup Tables tab.
- Press Allow All to grant access to all lookup tables and categories.
-
To assign rights to all categories in a table, select the lookup table to assign rights to the table.
When you select a specific lookup table, you are prompted to specify access to subcategories.
-
Select Yes to grant access to all subcategories and No to restrict access.
When access to a specific lookup table or lookup category is restricted, the user can not add, edit, delete, or merge lookup codes for the restricted lookup categories.
- To assign rights to specific category, display and check a specific category.
- To remove access to all lookup tables and categories, press Restrict All.
-
Complete the Distinct
Value Lookups section.
- Click the Distinct Lookup Tables tab.
- To grant access to all distinct value lookup tables and categories press Allow All.
-
To assign rights to all categories in a table, select the distinct value lookup table to assign rights to the table.
When you select a specific lookup table, you are prompted to specify access to subcategories.
-
Select Yes to grant access to all subcategories and No to restrict access.
When access to a specific distinct value lookup table or lookup category is restricted, the user can not add, edit, delete, or merge lookup codes for the restricted lookup categories.
- To assign rights to specific category, display and check a specific category.
- To remove access to all distinct value lookup tables and categories, press Restrict All.
-
Complete the Add-Ons section.
- Click the Add-Ons tab.
-
For each add-on, do the following.
- Check the box to the left of the add-on name to grant access to the add-on.
- Press Allow All to grant access to all add-ons.
- Press Restrict All to remove access to all add-ons.
- Check Disable User Login to disable the account so it can not be used to access FH.
- Press Save.
If you are setting up FIREHOUSE Software for the first time, you are now ready to set up lookup tables.
Information on lookup tables is available in Lookup Tables and Adding a Lookup Code.
Related Topics: