Modify the search pane of the data map skin
Note: Before you modify the interface for your custom data skin, you need to enable editing of the data skin interface. Information on enabling interface editing is available in Enable data skin interface editing.
Warning: Only highly skilled FH Mobile Response users should edit the FH Mobile Response interface in any way, as mistakes can cause unexpected behavior in the software, including shut-down. If you are uncertain that you have the necessary skills, contact FH technical support for assistance.
-
Start FH Mobile Response.
-
Choose Go → Config → Enable Forms Designer.
The ability to edit the interface for your custom data skin is now enabled in FH Mobile Response.
-
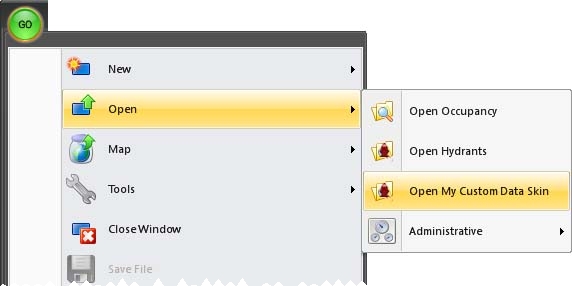
Choose Go → Open → Your data skin option name.
Note: When you edited the
DataDef.xmlfile, you specified the option name to represent your custom data skin on theDataTypeNameInMenusline. Information on editing this file is available in Edit the DataDef.xml file for the data map skin.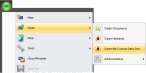
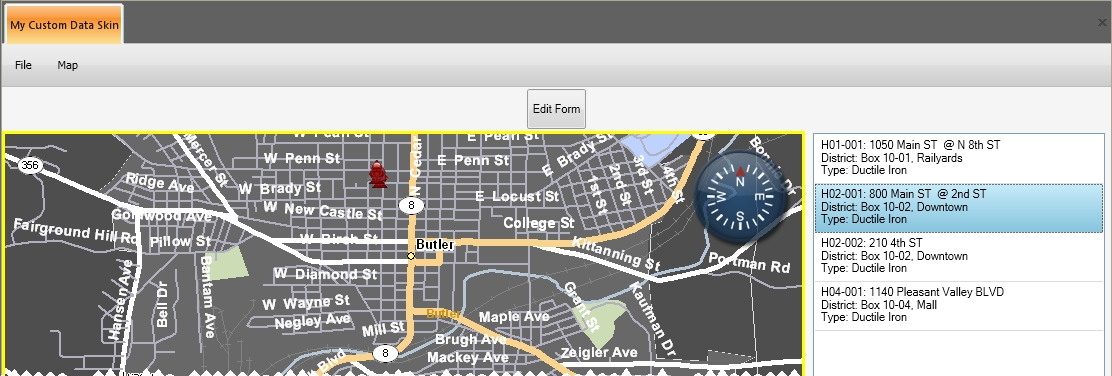
A new tab appears, named the same as the Your data skin option name option you selected. The tab contains the custom data skin you defined and an Edit Form button. By default, the custom data skin contains File and Map menus, a map, and to the right of the map, the data from the data tables you specified in the
DataDef.xmlfile.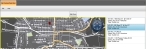
Information on editing the
DataDef.xmlfile is available in Edit the DataDef.xml file for the data map skin. -
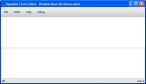
Click Edit Form.
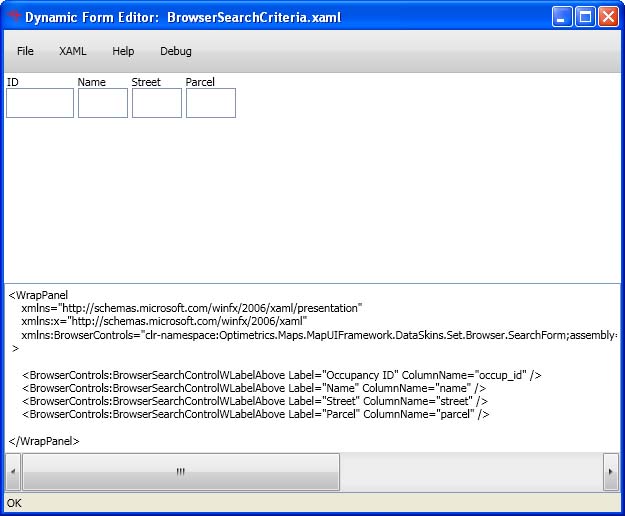
The Dynamic Form Editor dialog box appears. In a new data skin, both the top and bottom portions of the dialog box are blank. The bottom portion of the dialog box is an area where you can type XAML code and define search field interface elements to display on the tab. You can later use these search fields to filter the list of data to the right of the map. The top portion of the dialog box displays the search fields as you define them.
-
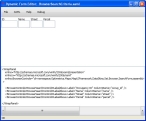
Click in the bottom portion of the dialog box, and then copy and paste the following lines.
<WrapPanelxmlns="http://schemas.microsoft.com/winfx/2006/xaml/presentation"xmlns:x="http://schemas.microsoft.com/winfx/2006/xaml"xmlns:BrowserControls=
"clr-namespace:Optimetrics.Maps.MapUIFramework.DataSkins.Set.Browser.SearchForm;assembly=Optimetrics.Maps.MapUIFramework" >
</WrapPanel> -
For each search field interface element you want to display on the custom data skin tab, on separate lines before
</WrapPanel>, add the following line.<BrowserControls:BrowserSearchControlWLabelAbove Label="XXXX" ColumnName="YYYY" />Example: If you want to have four different search fields for searching your data, add the line four times.
<BrowserControls:BrowserSearchControlWLabelAbove Label="XXXX" ColumnName="YYYY" /><BrowserControls:BrowserSearchControlWLabelAbove Label="XXXX" ColumnName="YYYY" /><BrowserControls:BrowserSearchControlWLabelAbove Label="XXXX" ColumnName="YYYY" /><BrowserControls:BrowserSearchControlWLabelAbove Label="XXXX" ColumnName="YYYY" /> -
For each line you added, replace
XXXXwith the name of the search field, as you want it to appear on the tab in FH Mobile Response.Example: If you have four different search fields for searching your data, you may modify the lines like this
<BrowserControls:BrowserSearchControlWLabelAbove Label="ID" ColumnName="YYYY" /><BrowserControls:BrowserSearchControlWLabelAbove Label="Name" ColumnName="YYYY" /><BrowserControls:BrowserSearchControlWLabelAbove Label="Street" ColumnName="YYYY" /><BrowserControls:BrowserSearchControlWLabelAbove Label="Parcel" ColumnName="YYYY" /> -
For each line you added, replace
YYYYwith the name of the column the data is in, in the table.Example: If you have four different search fields for searching your data, you may modify the lines like this
<BrowserControls:BrowserSearchControlWLabelAbove Label="ID" ColumnName="myID" /><BrowserControls:BrowserSearchControlWLabelAbove Label="Name" ColumnName="street" /><BrowserControls:BrowserSearchControlWLabelAbove Label="Street" ColumnName="name" /><BrowserControls:BrowserSearchControlWLabelAbove Label="Parcel" ColumnName="parcel" />A preview of the search fields you are defining in the bottom half of the dialog box appears in the top half of the dialog box.
-
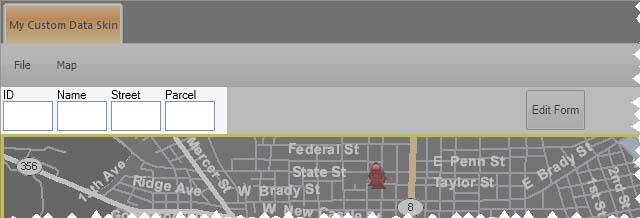
Choose File → Save and Exit.
The search fields appear on your custom data skin tab in FH Mobile Response, and a
BrowserSearchCriteria.xamlis automatically created in your custom map data skin folder.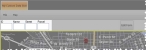
- Continue with Examples: XAML code and the resulting layouts on a tab.