Edit the DataDef.xml file for the data map skin
Note: Before editing the DataDef.xml file, you need to collect and set up the files needed for the data map skin you are creating. Information on setting up these files is available in Collect files needed for a new data map skin.
The DataDef.xml file contains all configuration settings (including where the data is located relative to the root map folder), the type of data, how labels are calculated, and how these types are included in incidents. This contains all of the information necessary to load the data for the user interface. This also supports special fields, which become document links and globally unique identifiers (GUIDs).
Note: Only point feature classes are supported; polygons and polylines may become supported in the future.
- (If you have not done so already) In Windows Explorer, navigate into
C:\Program Files\FH Mobile Response\Maps\DataSkins. -
Navigate into the folder containing the map data skin files you will customize.
Note: This is the
Copy of SAMPLEfolder that you renamed at the end of Collect files needed for a new data map skin. - Using a text editor such as Notepad, open the
DataDef.xmlfile. -
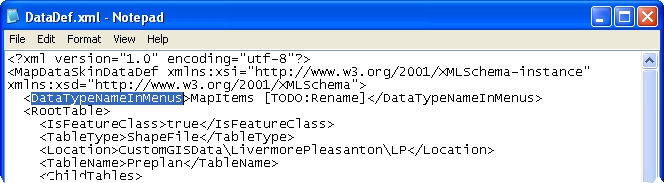
In the file, find
DataTypeNameInMenus.
-
Edit the text between
<DataTypeNameInMenus>and</DataTypeNameInMenus>to be the name of the option you want to add to the Go → Open menu in FH Mobile Response, to represent your custom data skin.Example: To add a File → Open → FH Occupancies option to FH Mobile Response, you would change
<DataTypeNameInMenus>MapItems [TODO:Rename]</DataTypeNameInMenus>
to<DataTypeNameInMenus>My Custom Data Skin</DataTypeNameInMenus> -
On the next line of the file, find
RootTable.The lines between
<RootTable>and</RootTable>indicates where data is located, lists child tables that contain related data, and provides information about columns that require special handling. A single row underRootTablebecomes an item in the data skin.Note: Not all columns need to be provided in the table definitions.
-
Under the
RootTableline, edit the text between<IsFeatureClass>and</IsFeatureClass>to indicate whether or not the table has geometry, or is a data-only table.Note: A value of
trueindicates that the table contains geometry, and a value offalseindicates that the table is a data-only table. -
Edit the text between
<TableType>and</TableType>to indicate the type of database that is hosting the table.Note: Supported values are
ShapeFile,GdbAccess, andGdbFile. -
Edit the text between
<Location>and</Location>to specify the directory or database path relative to the map folder.This path is typically
C:\Program Files\FH Mobile Response\Maps. TheMapsdirectory contains the.MXDfile and theDataSkinsfolder. - Edit the text between
<TableName>and</TableName>to specify the name of the table within the database. -
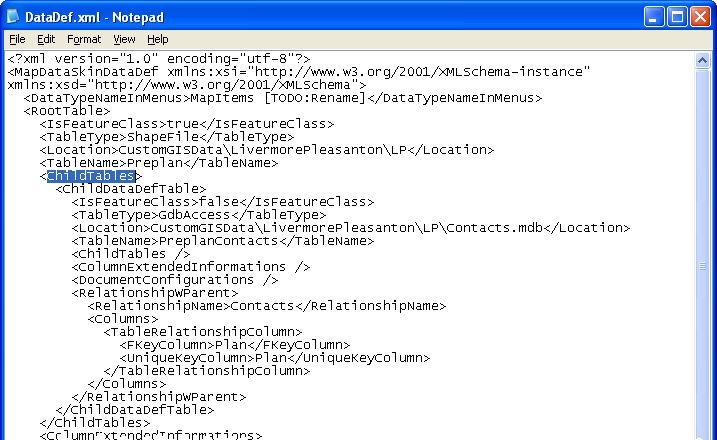
On the next line, find
ChildTables.
Every table can have a set of child tables that contain records related to it. A child table is exactly the same as the root table, except that it also provides information about the relationship with the parent table.
-
In the
ChildTablessection of the file, findRelationshipWParentand the lines below it.
- In the
RelationshipWParentsection, findRelationshipName. -
Write down the value between
<RelationshipName>and</RelationshipName>, for reference later in the configuration process.Note: The value in
RelationshipNameis required in the dialog box that lists the associated records. -
Search for
ColumnExtendedInformations.Note: You may find multiple occurrences of this line containing this tag in the file. If the line is
<ColumnExtendedInformations />, you do not need to specify any additional parameters for it. If the line does not end in/>, there is data below it in the file that you need to specify.
Note: While not all column data must be specified in the data skin definition, you can use the
ColumnExtendedInformationssection of the file to add special columns that require information that does not exist in the meta data. Any table can have its ownColumnExtendedInformationssection. -
 (If you need to add special columns to the data skin definition) Do the following.
-
On the line under
ColumnExtendedInformations, findColumnExtendedInformation.This line can have one of these values.
xsi:type="GuidColumnExtendedInformation"xsi:type="DocumentColumnExtendedInformation"
-
Do one of the following.
-
The value is xsi:type="GuidColumnExtendedInformation"
Columns that should have globally unique identifiers (GUIDs) created for new records need to specify this extended column information. This is typically used when there are child records that need to be related to a parent record, but the parent record has no other guaranteed unique field.
Example: A facility may calculate a facility ID as a GUID, and use this GUID to relate contacts in a
FacilityContactstable to aFacilitytable.Note: Using an
ObjectIdis not recommended, since clearing the table and repopulating it would obtain new object IDs for each record.- Edit the text between
<DataColumn>and</DataColumn>to specify the GUID for the column. - Edit the text between
<AutoCreate>and</AutoCreate>to indicate whether GUIDs should be automatically created for new records.
- Edit the text between
-
The value is xsi:type="GuidColumnExtendedInformation"

A column of this type is a link to a document in the Maps folder.
- Edit the text between
<DataColumn>and</DataColumn>to specify the name of the column. -
Edit the text between
<DocType>and</DocType>to indicate the type interface needed to display the data.Note: Supported values are
HTML_Link,PDF_File,ShellCmd, andExtensionBased.Use this value To do this HTML_LinkDisplay the link in a web browser. The
DocFilePathModeline determines how this link is resolved.PDF_FileShow a pdf file in a pdf viewer. The
DocFilePathModeline determines how the file location is resolved.ShellCmdLaunches the command in the database. If it is an image file, the default image viewer launches. If it is an HTML link, the default web browser launches.
ExtensionBasedLoad the file based on its file extension.
-
Edit the text between
<DocFilePathMode>and</DocFilePathMode>to indicate how paths are resolved to find the final path.Note: Supported values are
RelativeToMapRootandAbsolute.Caution: The path that is generated for the document is based on the value you enter for
DocFilePathMode, and theDocFilePathPrefixvalue you specify in the next step. If you specify a value ofRelativeToMapRoot, FH Mobile Response assumes the file is at the location <MapRootFolder><DocFilePathPrefix><RowColumnContents>. - (If the
DocFilePathModeline has a value ofRelativeToMapRoot) Edit the text between<DocFilePathPrefix>and</DocFilePathPrefix>to specify the prefix needed for relative paths to the row column contents (field contents). -
(If the
DocTypeline has a value ofShellCmdorExtensionBased, and if theDocFilePathModeline has a value ofRelativeToMapRoot) On the line underDocFilePathPrefix, add the following line.<DocCmdPrefix> </DocCmdPrefix>. -
(If you added a
DocCmdPrefixline) Between<DocCmdPrefix>and</DocCmdPrefix>, specify any additional path prefix needed for relative paths to the row column contents (field contents).If the
DocCmdPrefixline exists with a path value, FH Mobile Response assumes the file is at the location <MapRootFolder><DocCmdPathPrefix><DocFilePathPrefix><RowColumnContents>.Caution: If you specified a value of
HTML_LinkorPDF_Filein the<DocType>line, do not use theDocCmdPrefixline.
- Edit the text between
-
-
-
In the file, search for
ListItemFormatString.
-
Edit the text between
<ListItemFormatString>and</ListItemFormatString>to contain a format string that uses the value of fields in the root table.Caution: The names inside of
{ }must exist in the root table.Example: To list data from the root table on the data skin, you would change
<ListItemFormatString>ObjectId: {ObjectId}
Modify with fields and format string.</ListItemFormatString>
to<ListItemFormatString>
{name} {number} {st_prefix} {street} {st_type} {st_suffix} {city}
</ListItemFormatString>Advanced format strings are also supported.
Example: You could change
<ListItemFormatString>ObjectId: {ObjectId} Modify with fields and format string.</ListItemFormatString>
to<ListItemFormatString>{Created_Date:d}</ListItemFormatString>
At runtime, this is converted into the programming statementString.Format(“{0:d}”,data[“Created_Date”]); -
Edit the text between
<DocumentNameFormatString>and</DocumentNameFormatString>to insert a tab name and the name of a document when it needs to be displayed in a list or a tab.Note: The name of the document is calculated from the columns in the root table.
Example: To dispay a tab named Occupancy: <document name>, you would change
<DocumentNameFormatString>Preplan: {ObjectId}</DocumentNameFormatString>
to<DocumentNameFormatString>Occupancy: {occup_id}</DocumentNameFormatString> - Save and close the
DataDef.xmlfile. - Continue with Enable data skin interface editing.