Manually define a destination point for a route
-
(If the Routing Maps tab is not visible) Choose Go → Map → Routing Maps.
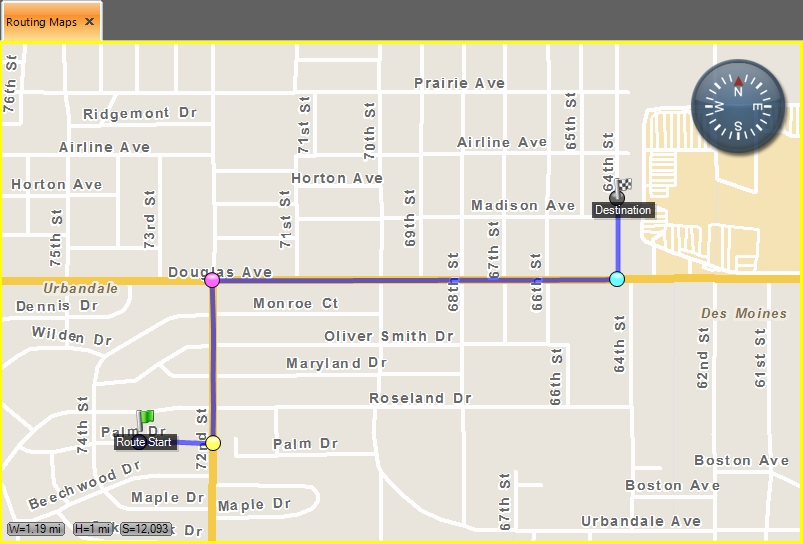
The Routing Maps tab appears. While FH Mobile Response can display a destination point on any map tab, it is assumed that you are setting the destination point as the final step in having FH Mobile Response calculate a route to the destination. The Routing Maps tab is best suited for displaying a route, because it displays additional information panes related to the route.
-
Do one of the following.
- (Basic) On the Main toolbar, click Route → Mark Destination.
- (Premium) On the Main toolbar, click Mark Destination.
- Choose Go → Tools → Routing → Mark Destination.
In the View / Op toolbar to the left of the map, Mark Destination and Cancel Mark Destination appear, and the mouse pointer becomes a cross-hairs. Mark Destination is automatically selected.
-
Click the location on the map that you want to identify as the destination point for a route.
A checkered flag indicating that the selected location is the destination point for the route appears, and the label
Destinationappears under the flag.
If you are using a global positioning system (GPS) device with FH Mobile Response (your current location is the starting point for the route), or if you have manually defined a starting point on the map, FH Mobile Response calculates a route between the starting point and the destination you defined.
If you manually set the starting point, the turn-by-turn directions pane in the lower right corner displays the message
Not Routing From GPS, and only the address of the destination point appears in the pane. If you are using a GPS device, the turn-by-turn directions pane populates with additional information.Information on defining a starting point is available in Manually define a starting point for a route. Information on configuring a GPS device with FH Mobile Response is available in Set up GPS communication with FH Mobile Response.