Set workstation-specific scheduling options
FH administrators can set global options for schedules on each workstations.
-
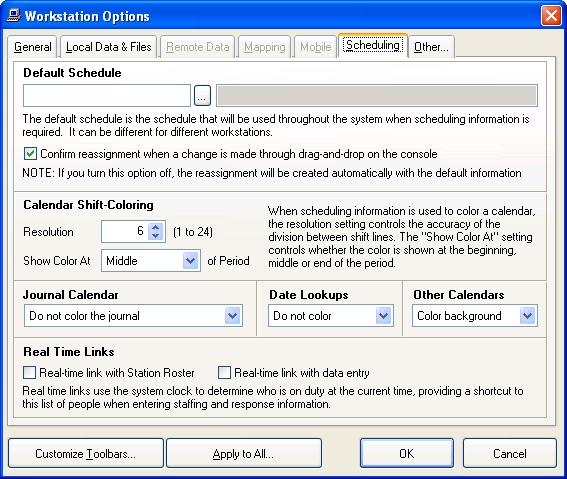
Choose Tools → Workstation Options.
The Workstation Options dialog box appears.
-
Click the Scheduling tab.
-
In Default Schedule, type the name of the schedule that you want displayed whenever you access the Scheduling Console dialog box, or click the lookup button
 and then use the Query dialog box which appears to select the schedule.
 The staff included in the specified schedule appear when adding staff to FH.
-
Select or clear Confirm reassignment when a change is made through drag-and-drop on the console to indicate whether the Schedule Personnel Reassignment dialog box appears after staff members are reassigned through drag-and-drop on the Scheduling Console dialog box.
When this option is cleared, default information is used for the reassignment, and the user is not prompted for confirmation.
Information on reassigning staff members is available in Reassign a staff member on a shift.
-
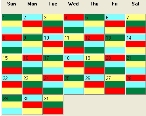
Under Calendar Shift-Coloring, in Resolution, specify the degree of hourly accuracy with which shifts can be represented with color on a calendar.
A day's block on a calendar can be divided into as many as 24 units, representing each hour in the day. Higher resolutions are necessary to display multiple shifts on a calendar, but may require more time to display. Lower resolutions may limit the number of shifts that can be displayed in one day.
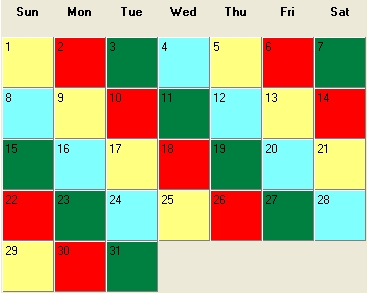
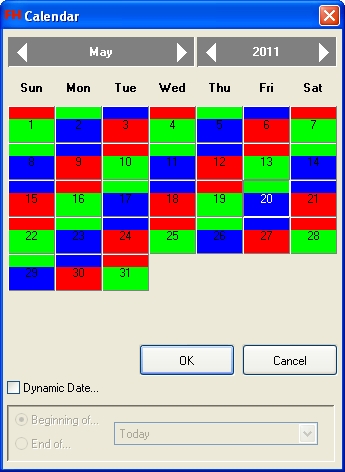
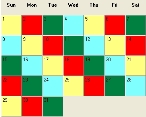
Example: For the first calendar below, Resolution has a value of 3, which sets the days on the calendar to display in eight-hour increments. For the second calendar , Resolution has a value of 1, which sets the days to display in one increment (of 24 hours). Notice that the second calendar can only display one shift for each day, since the entire 24-hour period must be represented by one increment.
-
From Show Color At, select the point in the increment to determine the color to display on the calendar.
Example: If you have a 24-hour shift and Resolution has a value of 3,the day is displayed on the calendar as three 8-hour increments. If Show Color At has a value of Middle, the color displayed in the calendar is the color of the shift on duty in the middle of the 8-hour increment. If Show Color At has a value of Beginning, the color displayed in the calendar is the color of the shift on duty at the beginning of the 8-hour increment.
Tip: Setting Resolution to 1 and Show Color At to Middle displays the primary shift on duty for the day, and meets the needs of most firehouses.
-
From Journal Calendar, choose an option that indicates how shift coloring appears on the calendar in the Department Journal dialog box.
Note: If you do not specify which schedule to use in step 3 for Default Schedule, your selection from Journal Calendar does not appear in the Department Journal dialog box.
Select this To do this Do not color calendar
Prevent shift color coding from appearing in the journal calendar.

Note: Choose this option if you are using a low-speed connection to the FH database.
Color background and use solid icons
Use a solid color background for icons displayed in the journal's day blocks.

Note: Choose this option if your shift colors obscure event icons. You can also enlarge the Department Journal dialog box to prevent colors from obscuring icons.
Color background and use transparent icons
Use a transparent background for icons displayed in the journal.

Color day number
Color the date number in a day's calendar block with the shift color, instead of coloring the background of the day's calendar block.

Note: Only one shift color can be displayed for each day, even if multiple shifts occur that day.
-
From Date Lookups, select an option to indicate whether you want to display shift color coding when you click a lookup button
that accesses the Calendar dialog box for selecting a date. 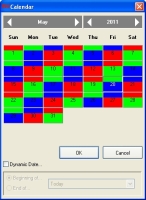
Note: If you choose Color day number, only one shift color can be used for each day, even if multiple shifts occur that day.
-
From Other Calendars, select an option to indicate whether you want to suppress shift color coding on other calendars in FH, or whether you want the shift color coding to be applied to the day's calendar block or day's date number.
Note: If you choose Color day number, only one shift color can be used for each day, even if multiple shifts occur that day.
-
Under Real Time Links, select or clear Real-time link with Station Roster to indicate whether or not to update the station roster with staff members associated with the current shift.
Caution: Do not select this option if you are using a low-speed connection to the FH database.
Tip: To take full advantage of the real-time link with station roster, choose Administration → Administrative Options. In the Administrative Options dialog box that appears, click the Staff tab, and from Default Staff Group Select Method/Page, choose Station Roster. When you are later working in a dialog box and you click Add Group, the Staff Group Select dialog box appears listing staff associated with the current shift.
-
Select or clear Real-time link with data entry to indicate whether or not to add staff members on the current shift to a selection list anytime you browse for a group of staff members.
Caution: Do not select this option if you are using a low-speed connection to the FH database.
Example: If you access the NFIRS lncident Report dialog box, click the Units & Personnel tab, and then under Personnel, click Add Group, the Add From Scheduling option exists in the menu that appears. When you select Add From Scheduling, the Staff Activity - Group Add dialog box appears, listing the staff members on the shift, and you can click OK to add them to the incident report.
Note: The date and time specified in the dialog box you are working in determines which shifts the staff members are drawn from. If the date and time in the dialog box are not available, the current time on your computer is used.
- Click OK.