Inspect an existing hydrant
-
On the left side of the bar at the top of the screen, touch the inspection type menu and select Hydrants.

-
In the middle of the bar, touch Scheduled or All to indicate which inspections you want to see.
Depending on whether you are using the map or the inspection list, markers appear on the map or items appear in the list update to reflect your selection.
Information on viewing inspections on the map or in the list is available in View inspections in a list or map format.
-
Do one of the following.
-
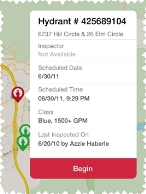
Touch a red (inspection) hydrant marker on the map.
A help balloon appears over the map, displaying information about the hydrant inspection you touched.
-
Touch a red (inspection) circle beside a hydrant number in the inspection list.
The list entry expands to display information about the hydrant inspection you touched.

-
-
Touch Begin.
For hydrant inspections, the Hydrant Details and Summary page appears.

-
(Optional) Edit information for the inspection.
 The field is a text-entry field
-
Touch the field.
If the field is editable, a cursor appears in the field, and the iPad keyboard appears at the bottom of the screen for you to edit the entry in the field.
The field has a menu arrow
-
Touch the field, and then select an option from the menu that appears.
Example:
-
-
(Optional) Review prior completed inspections for this hydrant.
-
In Activity Summary, under Report, touch the eye icon
 for a completed inspection report you want to read.
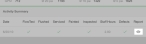
The Inspection page appears, displaying the selections and calculations made during that inspection.
- Touch Back in the upper right corner of the screen to return to the Hydrant Details and Summary page.
-
-
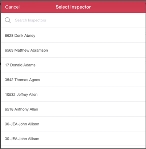
In the upper right corner of the screen, touch Begin Inspection.
The Select Inspector dialog box appears.
-
Select the name of the inspector performing the inspection.
The Inspection page appears.

-
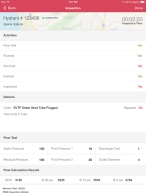
Under Activities, if the hydrant passed the inspection question, touch the slider and drag it to the right, so that the background of the slider turns green.

-
(If defects were found in the hydrant) Record information about the defects.
-
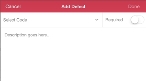
In the middle of the interface, on the right side, touch Add Defect.
The Add Defect dialog box appears.
-
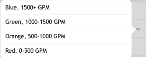
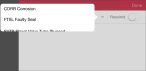
For Select Code, touch the menu arrow, and then touch an option describing the defect from the menu that appears.
-
(Optional) Touch Description goes here, and then use the iPad keyboard to enter a more detailed description of the defect.
Note: When you are finished, touch the keyboard collapse icon
 on the iPad keyboard.
 - (If applicable) For Repaired touch the slider and drag it to the right, so that the background of the slider turns green to indicate that the recorded defect has been repaired.
-
In the upper right corner of the dialog box, touch Done.
The Inspection screen reappears, and the new defect listing appears in it.
- Repeat steps a–e for each defect found for the hydrant.
-
- Under Flow Test, for each of the fields, touch the numerical value, and then use the iPad keyboard that appears to enter a numerical value.
-
Touch Calculate.
The calculation results appear under Flow Calculation Results.
-
In the upper right corner, touch Done.
The map or inspection list reappears.


