Inspect or re-inspect an occupancy
-
On the left side of the bar at the top of the screen, touch the inspection type menu and select Business.

-
In the middle of the bar, touch Scheduled or All to indicate which inspections you want to see.
Depending on whether you are using the map or the inspection list, markers appear on the map or items appear in the list to update to reflect your selection.
Information on viewing inspections on the map or in the list is available in View inspections in a list or map format.
-
Do one of the following.
-
Touch a red (inspection) or yellow (re-inspection) occupancy marker on the map.
A help balloon appears over the map, displaying information about the inspection or reinspection you touched.

-
Touch a red (inspection) or yellow (re-inspection) circle beside a business name in the inspection list.
The list entry expands to display information about the inspection or reinspection you touched.
-
-
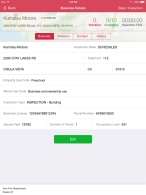
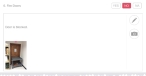
Touch Begin or Re-Inspection.
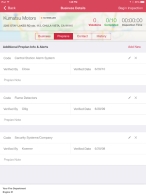
The Business Details page appears, set to the Business tab.
-
(Optional) Touch the Preplans, Contact, or History tabs to access additional information about the inspection.

-
(Optional) On the Business tab, touch Edit.
The Occupancy Changed and Building is Vacant buttons appear at the bottom of the interface.

-
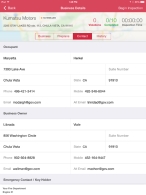
(Optional) Edit information for the inspection.
 The field is a text-entry field
-
Touch the field.
If the field is editable, a cursor appears in the field, and the iPad keyboard appears at the bottom of the screen for you to edit the entry in the field.
The field has a menu arow
-
Touch the field, and then select an option from the menu that appears.
Example:
-
-
(If the business at the address has closed or changed) Indicate one of the following.
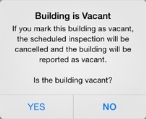
The building is vacant
-
Touch Building is Vacant.
The Building is Vacant dialog box appears.
-
Touch Yes.
The occupant has changed
-
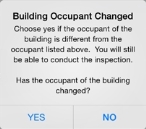
Touch Occupancy Changed.
The Building Occupant Changed dialog box appears.
-
Touch Yes.
The Occupant Changed dialog box appears.
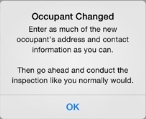
- Click OK.
- Edit the information on the Preplans, Address, and Contact tab as needed to update the occupancy information.
-
-
(If you touched Edit Details and made information changes) At the top of the user interface, touch Save or Cancel.
-
In the upper right corner of the screen, touch Begin Inspection.

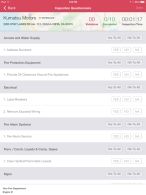
The Inspection Questionnaire page appears.
-
For each item in the questionnaire, touch Yes, No, or NA to indicate whether the item passes inspection or a violation is found.
Tip:
- In the heading of a group of questions, you can respond to all the inspection items in the group at once by touching Yes To All or NA To All.
- At the top of the Inspection Questionnaire, a pair of counters indicate how many of the questions in the questionnaire have been answered and how many violations have been noted.
-
(If a violation is found) Record information about the violation.
The Enter Note dialog box appears.
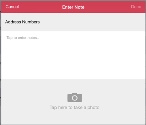
- In the center of the dialog box, touch the grey text Tap to enter notes, and then use the iPad keyboard that appears to enter text describing what caused the item to fail for the inspection.
-
(Optional) Attach a photo of the violation to the inspection item.
-
At the bottom of the dialog box, touch the camera button.
A menu appears.
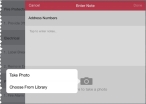
-
Depending on whether or not you already have a picture of the violation, do one of the following.
Take a new photo of the violation
-
Select Take Photo.
The iPad's internal camera activates.
- Take the picture of the violation with the iPad as normal.
Attach a photo already on the iPad
-
Select Choose From Library.
The Photos menu appears.
- Use the menu to navigate to and select the photo that you want to attach to the item.
Note: A prompt to allow FH Inspector to access the photos on your iPad may appear. This prompt only appears the first time you try to add a photo to a violation. If it appears, touch OK.

The picture will automatically attach to the item, and appears in the item listing. If necessary, you can attach multiple photos to a violation.

-
-
-
In the upper right corner of the dialog box, touch Done.
The notes and any photos you added through the Enter Note dialog box appear in the inspection item that you touched No for.
-
(Optional) Scroll to the bottom of the inspection list, touch the white area below Inspection Note, and then use the iPad keyboard that appears to enter any notes you want to add that applies to the inspection in general.
Note: When you finish adding notes, touch the keyboard collapse icon
 on the iPad keyboard to return to your inspection.
 -
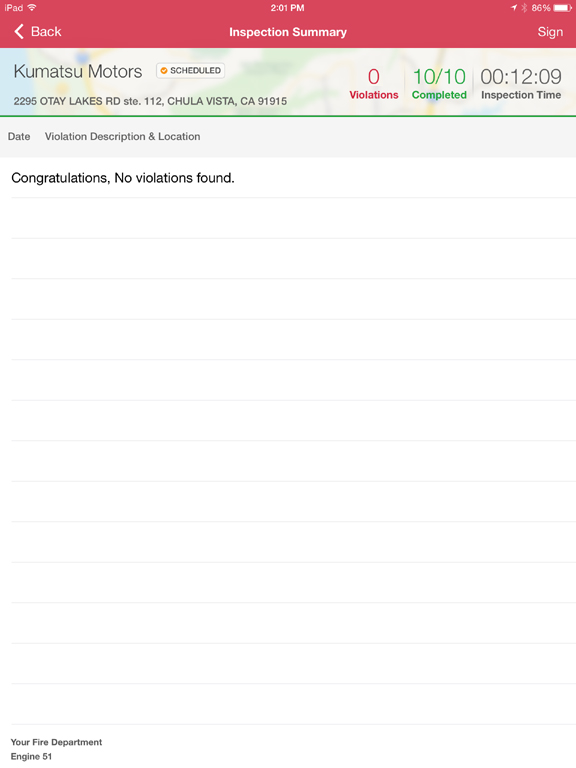
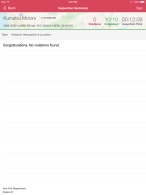
When all of the items in the questionnaire have been responded to, in the upper right corner of the interface, touch Done.
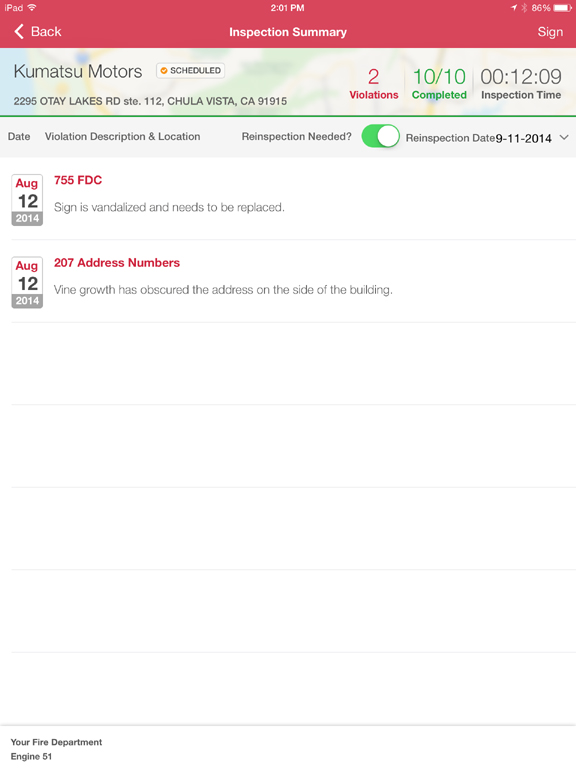
A statement that no violations were found appears, or a summary page of violations found during the inspection appears. If there are violations, the Reinspection Needed? and Reinspection Date fields appear on the right side, above the list of violations.

By default, the Reinspection Needed slider is moved to the right and the background of the slider is green, indicating that a reinspection is needed.
- (If a reinspection is not needed) For Reinspection Needed, drag the slider to the left, so that the background of the slider turns white.
-
(If violations were found) Schedule a reinspection date.
-
For Reinspection Date, touch the date field, and then touch the month, day, and year that a re-inspection should take place.
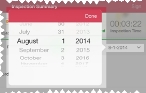
- In the upper right corner of the date menu, touch Done.
-
-
In the upper right corner, touch Sign.
The Legal Agreement dialog box appears.

-
Ask the business occupant to touch the blank area under the legal agreement text, and to "write" his or her signature with a finger.
Warning: This signature must be made by the business occupant.
-
At the bottom of the dialog box, touch Who Signed the Inspection, then use the iPad keyboard that appears to type the name of the business occupant.
Note: When you are finished, touch the keyboard collapse icon
on the iPad keyboard. -
In the upper right corner of the dialog box, touch Done.
The Inspector Signature dialog box appears.

- (If necessary) At the bottom of the dialog box, touch the name of the inspector, and then choose a different inspector from the list of inspectors that appears.
-
Touch the blank area above the inspector name and "write" your signature with a finger.
Warning: This signature must be made by the person who performed the inspection.
-
In the upper right corner of the dialog box, touch Done.
The violation summary page reappears. In the upper right corner, Done replaces Sign, and View PDF appears at the bottom of the page.

-
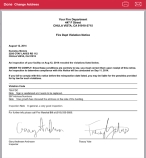
(Optional) Touch View PDF and review the violation notice.
The PDF file of the violation notice appears.
-
(Optional, if viewing the PDF file) Do any of the following.
Change the address for the report
If necessary, you can change the name and address that appears on an inspection report PDF, so that you can send the report to the occupancy owner at a different address, rather than to the occupancy address.
-
In the upper right corner of the dialog box, touch Change Address.
The Change Address dialog box appears.
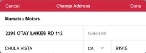
-
Edit the address information as needed, then touch Done.
The PDF version of the inspection report reappears, displaying the new address.
Email the PDF file
-
In the upper right corner of the dialog box, touch the email icon
 .
. An email browser appears with the content of the violation notice in the body, and the Subject line of the email already filled in.
- In To, specify the email addresses you want to send the violation notice to.
- In the upper right corner of the interface, touch Send.
Print the PDF file
-
In the upper right corner of the PDF, touch the send icon, and then touch Print.
The Printer Options dialog box appears.
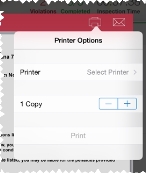
- Respond to the prompts in the dialog box as appropriate.
Close the PDF file
-
In the upper left corner of the PDF, touch Done.
The violation summary page reappears.
-
-
In the upper right corner of the user interface, touch Done.
The map or inspection list reappears.