Configure a client for the integration
Note: You must have already installed and configured FH Mobile Response on all client (mobile) computers.
Information on installing and configuring FH Mobile Response is available in FH Mobile Response Installation Guide.
-
Launch FH Mobile Response, and then choose GO → Config → Options.
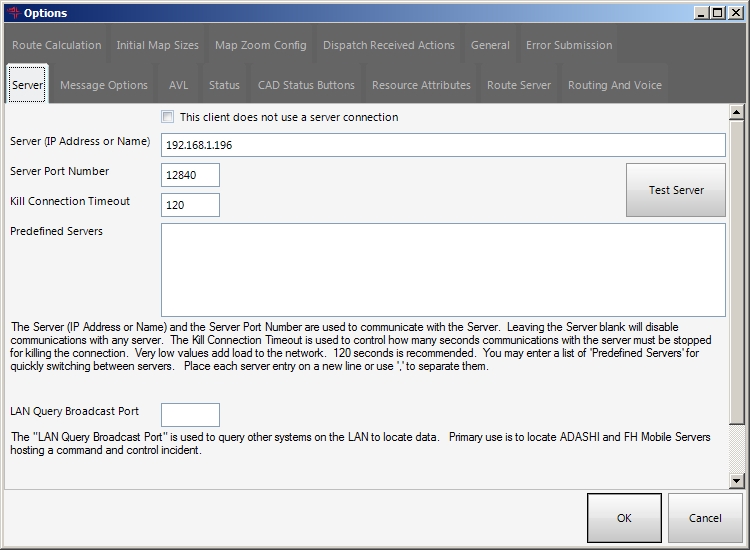
The Options dialog box appears.
- On the Server tab, in Server (IP Address or Name), type the name of the FH Mobile Response server, or its Internet protocol (IP) address.
-
In Server Port Number, verify that
12840, the default port number for communications between the FH Mobile Response server and client (mobile computers), appears.Note: If a different port number was specified when the FH Mobile Response was installed, type the new port number instead. If you are uncertain what the port number is, contact the person who installed the FH Mobile Response server, verify the port number.
-
Click Test Server.
Note: If the connection fails:
- If you are using the name of the server in Server (IP Address or Name), try replacing the name with the IP address to resolve the problem.
- When you installed the FH Mobile Response server earlier, port
12840may not have opened during the installation as expected. This can occur if your environment uses higher Windows firewall settings, or if you use a third-party firewall such as Norton™ by Symantec. If this is the case, you can manually open the port for your operating system, as described in Troubleshooting your installation.
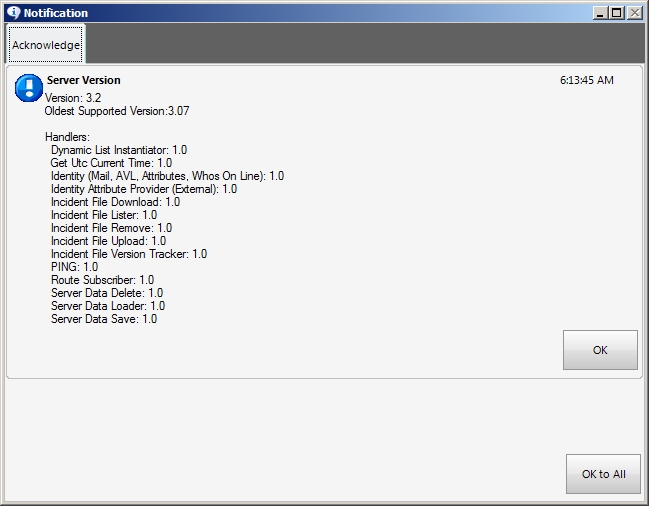
If the connection is successful, the Notification dialog box appears, indicating whether it could successfully connect to the server, and the FH Mobile Response version number of the server.

- Click OK in the Notification dialog box, and then click OK in the Options dialog box.
-
Choose GO → Server → Change Login.
The Login dialog box appears.

-
In Login Name, type the number of teh unit your mobile computer is being carried on.
Example:
TankerTruck2Tip: If you have logged in before, a list of the names you have used appears under Previous Login Names. If you select one of these names, the selected name appears in Login Name.
-
Click Login.
The dialog box closes, and in the lower left corner of the interface, in the status bar, a User message appears displaying the user name you logged in with.

The mobile computer is listed on the FH Mobile Response server with the login name you specified. This name appears for users of other mobile computers logged in to the same FH Mobile Response server that your mobile computer is logged in to, when they start a new unit-to-unit message or instant message (IM) conversation.
- Exit FH Mobile Response.
-
Repeat the steps above for each client (mobile) computer that you want to integrate with the CAD system.
You have completed configuration for the integration between FH Mobile Response and a CAD system. Now, when you are using FH Mobile Response and a call comes in from the CAD system, the data file arrives in the folder you configured, the FH Mobile Response server processes it, and a dialog box appears on the FH Mobile Response interface, asking whether or not you want to be routed to the call location.
-
Click OK.
FH Mobile Response determines the most efficient route to the location, and the route line appears on FH Mobile Response interface.