Areas
By default, FH Sketch prompts you to define the area every time you launch FH Sketch or begin a new sketch file. FH Sketch needs the area definition to handle the distribution of area calculations on printouts, and to pass data to integrated applications such as third-party URAR forms or CAMA Systems.
You can access the Define Area dialog box by choosing Draw → Define Area, or by pressing F4 on the keyboard.
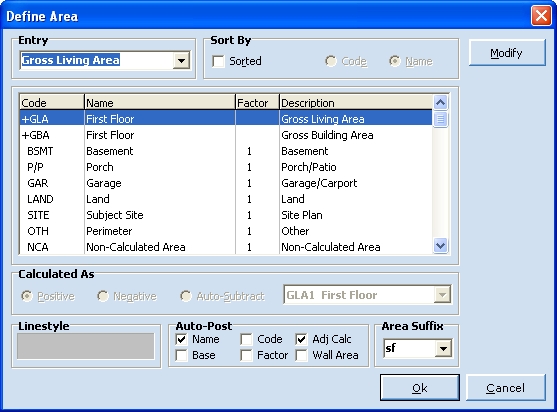
The Define Area dialog box has the following sections.
| Section | Lets you |
|---|---|
|
Entry |
Use the default name provided, or to change the name to one you prefer. To change the name, in Entry, type a new name for the area. |
|
Area |
Specify what type of area you would like to create. FH Sketch has pre-defined areas for gross living area, gross building area, basement, porch/patio, garage/carport, land, site plan, other, non-calculated area, and undefined area. As you select each area type, in the lower left corner of the dialog box, Linestyle displays the type of line drawn for that area. |
|
Calculated As |
Designate negative areas or automatically subtract one area from another to address special circumstances, such as stairwells, open-to-below areas, and atriums. Choose Negative to deduct an area from the total calculations, as long as both areas are of the same type. Example: To deduct an open-to-below area from the second floor, you would define and draw the second floor as a GLA2 area. When defining the loft, you would also define it as GLA2 and name it something appropriate, such as "Open to Below." Then you would select Negative to carry a negative square footage that appears in the calculation summary.
There are circumstances where it is not appropriate to show an area as negative, such as when drawing a garage. For these situations, you can select Auto-Subtract to define the areas as different types, and to list the garage with a positive calculation. Example: Assume the footprint of the property is drawn (GLA1), and that it encompasses the garage area. You would define a new area and, in the Define Area dialog box, and you would then select Garage (GAR). You would leave the name the same, select Auto-Subtract, and then in the menu to the right of Auto-Subtract, choose the area you would like to subtract from (the GLA1 First Floor). This achieves similar results to a negative area, but maintains a positive calculation.
Note: You cannot subtract from the same area type. For example, you cannot automatically subtract a GLA type from another GLA area. In those situations, you should define the area as negative. |
|
Auto-Post |
Automatically post data about the area once you close the area. |


Tip: To begin drawing first and define the area after it is drawn and closed, choose Draw → Draw First.