Set up automated tasks
- Log into FH as an administrator.
-
Choose Administration → Automated Tasks.
The Automated Task Setup dialog box appears.
-
Click New.
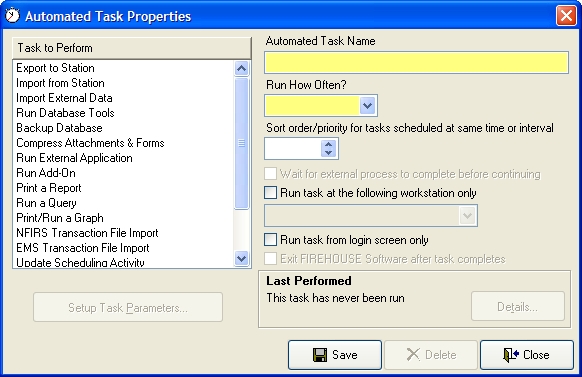
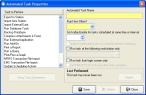
The Automated Task Properties dialog box appears.
-
 Set up an automated task for exporting cost recovery data to files.
- From Tasks to Perform, scroll down and select Run Custom Data Export.
- In Automated Task Name, type
Cost Recovery Data Export. -
From Run How Often, select the option corresponding to how frequently you want the cost recovery data export task between to run.
Depending on which option you select, additional options may appear to the right of Run How Often.
Example: If you select Weekly or Monthly, the Day and Time of Day options appear. If you select Timed, the Every option appears.
- (If additional options appear) Specify values appropriate for the additional options.
- In Sort order/priority for tasks scheduled at same time or interval, enter
1. -
Click Setup Task Parameters.
The Custom Data Export dialog box appears. The FH Cost Recovery data export is named with your department name, your FH serial number, the string
for Cost Recovery, and a version number.Example:
SomewhereFD- 111111111- for Cost Recovery v3456 -
Select the name of your FH Cost Recovery data export, and then click Select.
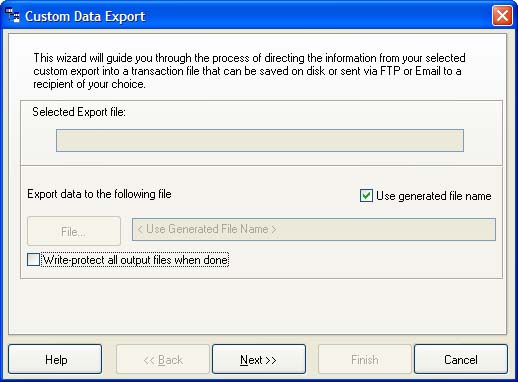
The Custom Data Export wizard appears.

-
(Optional) Change the location and name of the file the export creates.
By default, the file is written to the
EXPORTX\firedepartmentname_FHserialnumber_for_Cost_Recovery_versionnumber_yymmdd.XML-
Under Export data to the following file, clear Use generated file name.
The File button and its field become active.
- In the field, type the path and name you want the export to create, or click File and use the file browser that appears to navigate to the location and specify the file name.
-
- (Optional) Select Write-protect all output files when done.
-
Click Next >.
The Completion screen of the wizard appears.

-
Select No, just leave the file on the hard drive, and then click Next >.
The summary screen of the wizard appears.
-
Review the information on the summary screen, and then click Finish.
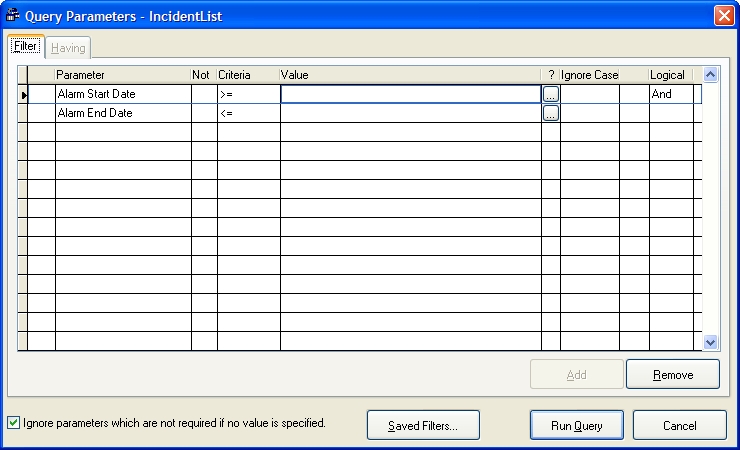
The Query Parameters - Incident List dialog box appears.
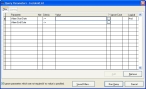
- In the Alarm Start Date row, in the ? column, click the lookup button
 .
. -
In the Calendar dialog box that appears, select Dynamic Date.
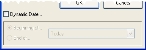
The fields below Dynamic Date activate.
- Select Beginning of, and then select an option from the menu to the right of the Beginning of.
- Click OK.
- In the Alarm End Date row, in the ? column, click the lookup button .
- In the Calendar dialog box that appears, select Dynamic Date.
- Select End of, select an option from the menu to the right of the Beginning of, and then click OK.
-
Click Run Query.
The Automated Task Properties dialog box reappears.
-
Click Save, and then click Close.
A dialog box prompting you to start the automated task processor appears.
-
Click No.
-
Set up an automated task for running the external application.
This application processes the exported data and submits data that meets the appropriate criteria to Firehouse.
-
In the Automated Task Setup dialog box, click New.
A blank Automated Task Properties dialog box appears.
- From Tasks to Perform, scroll down and select Run External Application.
- In Automated Task Name, type
Run Cost Recovery Application. - From Run How Often, select the same option you selected for running the FH Cost Recovery data export.
- Specify the same values for additional options as you did for running the FH Cost Recovery data export.
-
In Sort order/priority for tasks scheduled at same time or interval, enter
2.The FH Cost Recovery application will run as soon as the FH Cost Recovery data export finishes.
-
Click Setup Task Parameters.
A file browser appears.
- Navigate to your Firehouse installation directory, and open the
fhibsend.exeyou extracted from the.zipfile earlier. - In the Automated Task Properties dialog box, click Save, and then click Close.
-
In the Automated Task Setup dialog box, click Close.
Tip: When the the FH Cost Recovery application runs, an
export.logfile is written to the Firehouse installation directory, containing information about the data being processed.
-
- Continue with Enable the automated task processor.